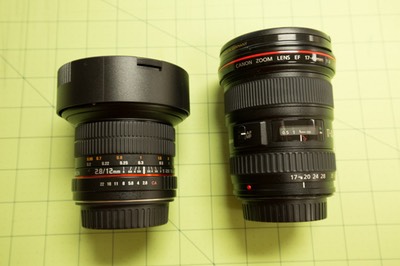
Rokinon 12mm and Canon 17-40 F-4 Zoom
I have started some hands-on testing of this new UWA fish-eye lens from Korean Manufacturer Samyang. I’ve not had the lens very long as this is written, so consider these thoughts as preliminary. Samyang markets their lenses under multiple names. The version that I have is marked as a Rokinon lens. As far as I know, there is not any difference between a Samyang marked lens and a Rokinon marked lens. Samyang is known for putting a lot of value into their lens line. If you can adjust to their quirks, the image quality can equal or even exceed that from lenses several times their price.
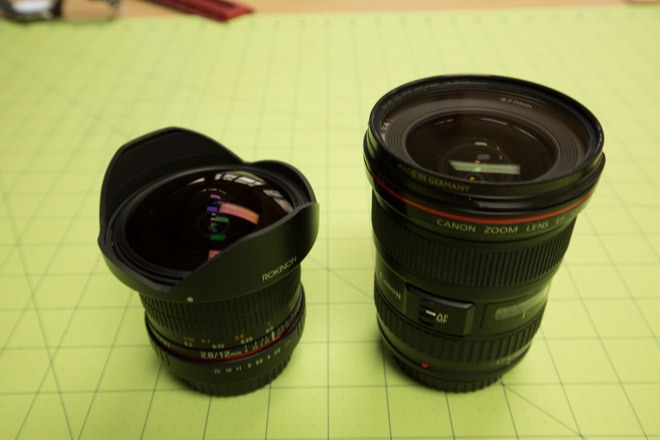
The Rokinon 12mm lens arrives in a box with a front lens cap, rear lens cap, lens hood, a fold-out manual of sorts, and a warranty card. There is not any pouch or lens container included. The front lens cap slides over the outside of the petal style lens hood. The lens cap provides adequate protection of the bulbous front element of the lens.
Construction:
The lens appears to be solidly constructed with a metal body and metal mounting plate. The lens is somewhat smaller than I expected for a F2.8 UWA. The Lens diameter is just over 77mm and is about 73mm long. The Canon compatible version that I have weighs 515g, and balances nicely on my Canon 5D III Camera Body. The focus is fully manual on a Canon Body without any focus confirmation on the body. The Nikon version does have electronic focus confirmation, but I have not used the Nikon version of the lens (also available in Canon M mount, Fuji X Mount, Sony E Mount and Samsung NX Mount). The manual focus ring has an extremely nice feel to the rotation. Rotation is damped just right and has consistent resistance throughout its travel. The stops at both ends of focus are slighly soft, like coming to a stop against a compliant pad. The focus ring is marked in feet and meters. Most of the focus turning range occurs between about .66 ft (minimum focus distance) to about 4 ft on the scale. Infinity focus is reached quickly after 4 ft.
The petaled lens hood is not permanently attached, even though I initially thought is was. Its tight, but will twist off. I will leave the hood permanently attached as it affords some protection for the bulbous front element bumping against something. Using filters will be problematic for this lens as there is not a simple way to attach a filter. It would be difficult (maybe impossible) to make a custom filter holder because the field of view is so wide, but there’s probably not much demand for a filter on this lens. Polarizers often don’t provide good results with UWA lenses because of the wide variation is sky density that is produced over a wide angle. ND filters may not see many straight horizon lines on a fish-eye lens.
The manual aperature ring works nicely with clicks at all full stops from f 2.8 - f 22. For all except the F 2.8 to F 4 gap, 1/2 stop clicks also are present. Aperture setting is fully manual, and the camera will not record the selected setting on Canon EOS models. There is no depth of field scale, but a 12mm lens has a lot of depth of field (DOF), even at wide aperatures. There are no electronics in the Canon version of this lens and no electrical contacts on the rear face.
Using the 12mm Fish-Eye Lens:
This lens provides a full frame (FF) wide angle view in spades! The diagonal angle of coverage is 180 degrees. Practically, this means that almost everything in front of the camera will be in the frame. Amazingly, this lens has a much wider angle than the Rokinon 14mm lens which has ONLY a 114 degree field of view. I found that I had to be careful when holding the focus ring with one hand so that part of that hand was not in the frame. Toes and tri-pod legs can also get in the way. This is my first experience with a fish-eye lens so there is going to be a learning curve and I’m still climbing that curve. Straight lines in the world (view) that pass through the center of a frame remain streight in a fish-eye view, but other straight lines have some curvature. Circles around the center of view will remain circles. The lens is promoted as a stereoscopic projection design. This is a type of projection often used in map making to project continents on the surface of a spherical earth onto a plane flat map. The stereoscopic projection is conformal and retains angles but not areas. Visit Wikipedia for a more complete description. One way to think about the lens projection is that areas near the center of view are somewhat compressed axisymmetrically and areas near the outer edges are somewhat expanded.
Distortion:
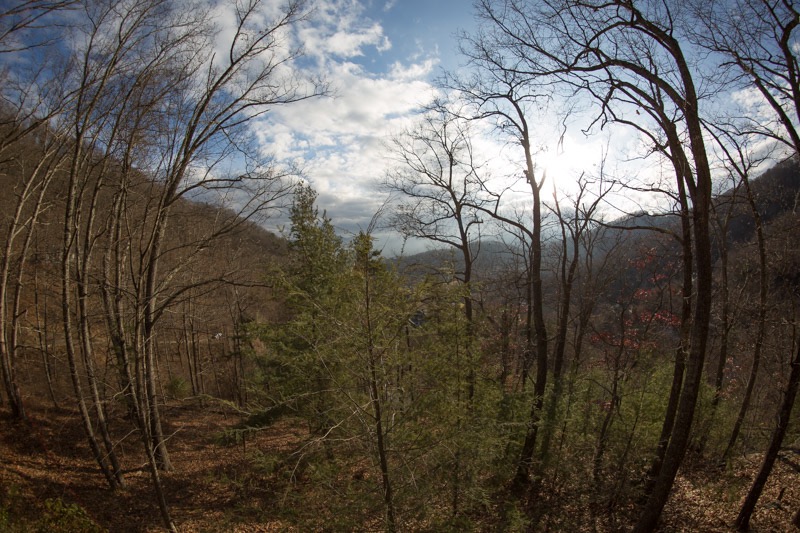
Distortion is not likely to be an issue with this fish-eye lens. The lens is designed to give a non-rectilinear image mapping so it would be difficult to separate out any unintended distortion. You will see a lot of curved lines and bent shapes in images but that is the intended image mapping for this lens. Above is a quick, hand held shot off my deck using thru the view finder focus (so its a little soft). The fish-eye image mapping can be seen clearly as my trees are not really curved. Also, the sun is behind some light clouds with blown-out highlights in the clouds. There is very little flare in this image. Some slight flare can be seen on the back side of the tree trunk near the blown-out clouds. But from this admittedly small sample, flare does not seem to be a major issue. I am in the midst of several day of rain and clouds, so a view of the sun is not available to photograph directly.
Sharpness:
I don’t have quantitative test equipment to be able to tell you exactly the resolution of this lens. I’m posting some photos for you to decide for yourself if the lens meets your needs. I have made a few shots to help me see how the lens performs. I noticed immediately that focus could be an issue. The lens has such a broad DOF that it is difficult to tell where focus is sharp when looking through the viewfinder. At 12mm focal length, any object more than a few feet away is difficult to critically focus through the view finder because detail is so small. One way to focus is to estimate distance and to simply set the focus ring using the distance scale (prefocus) . With this lens, everything more than 15 ft away is essentially at infinity focus (even at f 2.8). The last printed number on the focus ring before infinity is 3 ft. So, between 3 ft and infinity, estimating distance and setting the focus ring based on this estimate is not going to work well. Another question is how accurate are the markings on the focus ring? I have two other Rokinon lenses (14mm and 35mm) where the markings are pretty far off from the true distance. I checked this lens at 3 ft (measured from sensor plane to target plane) and at 1 ft. The markings are more accurate than they were on my other Rokinon lenses, but still a bit off (about 6-9 in off at 3 ft, and 2-3 in off at 1ft). Lens copy to copy variations may give other results. Nailing critical focus with this lens requires me to use "live view" at 10X magnification and a Hoodman screen viewer loupe. Because of the large depth of field, critical focus won’t be necessary in every situation. I checked infinity focus at a 15 ft distance and found it to be just past the infinity mark on the focus ring (about 1/2 way between the infinity mark and the hard stop). I put a pencil mark on the focus ring at true infinity focus so I can find it quickly without actually having to go through the live view procedure. I’ve also put this mark on my other Rokinon lenses. For night photography, I’ve found that using the pencil mark is quick and accurate for infinity focus. I also checked to see if focus shifted with a change in f-Stop as this has been an issue for me with the Rokinon 14mm lens. Thankfully, I’m seeing no discernable focus shift with f-Stop on this fish-eye lens.
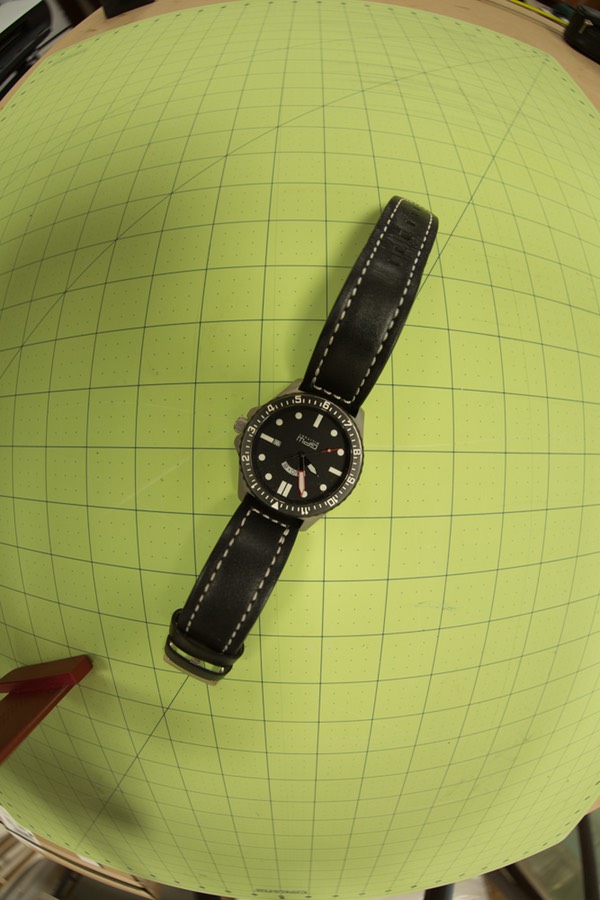
Just for fun, I tried a photo at close to minimum focus distance (about 8 inches). I placed my watch on a 24 x 36 in grid mat. Even at a distance of 8 inches (about 4 inches from the front of the lens), the grid mat did not completely fill the full frame image. This will never become your Macro lens, but it is able to produce sharp images of objects close to the glass. DOF is important at these close distances as you can see in the watch photos. I focused on the face of the watch and you can see that the grid background (only 3/8 in behind the watch face) goes slightly soft at this F 2.8 aperture. But, the watch face itself is very sharp. You may have to download and expand to get a closer view.
Interior Architecture is a potential use for an UWA lens; however, Fish-eye lenses are not going to be a hit for architectural photographers because of the extreme distortion. Below is a shot (at ISO 100) of an interior with wood beams. Notice how the beam through the center is straight, and others are are curved. The selected Focus point is at the center of the frame. I made multiple shots of this image from a tripod at multiple f-Stops using aperture priority (letting the camera set shutter speed and I manually set aperture). To get an idea of sharpness I’m showing crops at the extreme upper left corner and in the center of the image at full pixel resolution.
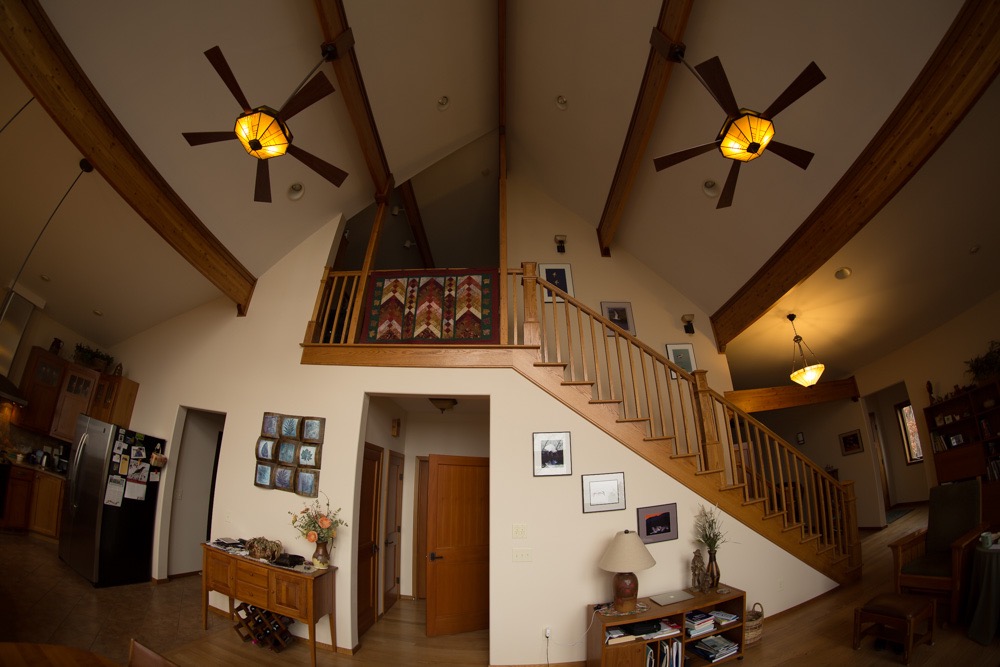
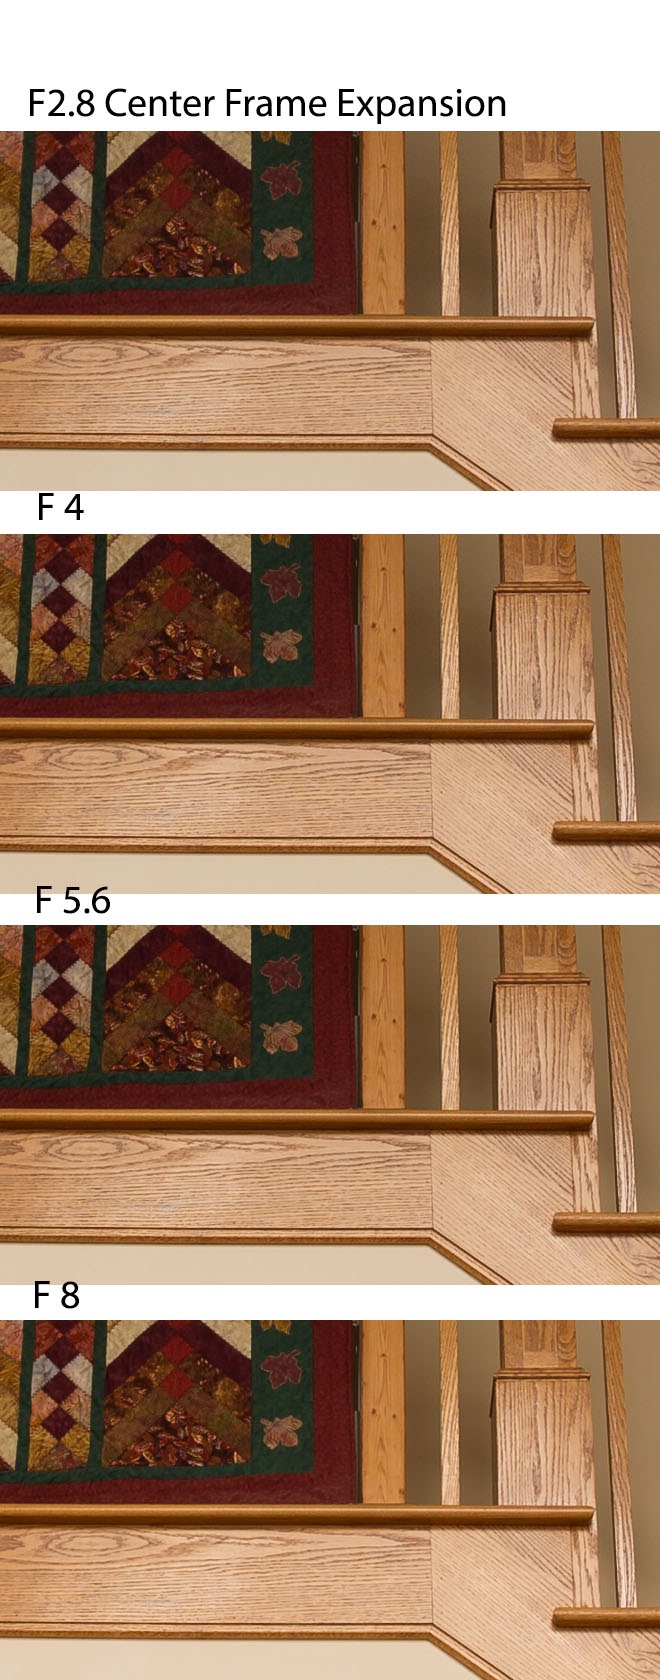
To my eye, the center frame expansion of the Room image looks quite sharp from F 2.8 thru F 8 will little discernible difference. Some exposure adjustments were made in Adobe Light Room so the brightness was fairly close in each expansion. Also, a little sharpening was added in Amount 40, Radius 1.3. Now look at the Upper Left Corner of the Room image (also some brightness adjustments and same sharpening). I did not make any contrast or clarity adjustments. The lens contrast (without adjustments) looks very good to me.
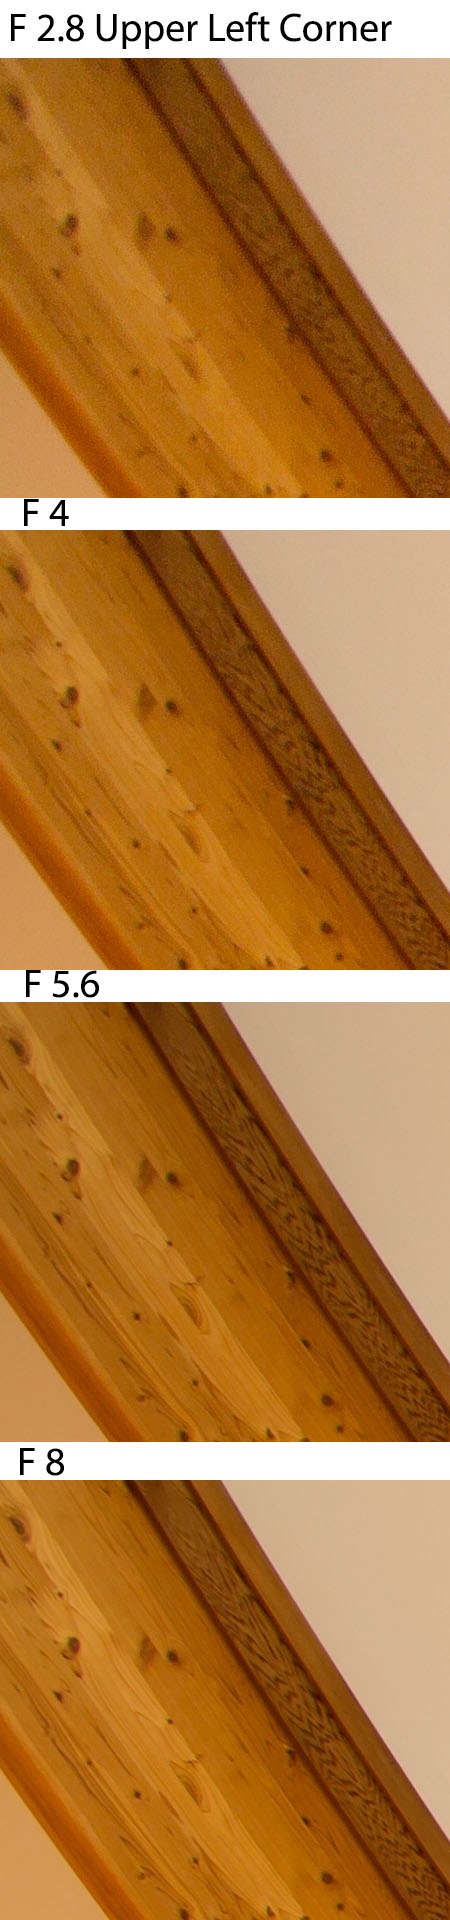
Obviously there is a considerable amount of focus softness in the extreme corner of the image at F 2.8, and gradually improving thru F 5.6, with little if any more improvement at F 8. Still, I would call this very impressive for a 12mm lens. If extreme corner sharpness is important, then shooting at F 5.6 or F 8 will produce outstanding image sharpness over the entire frame. For astrophotography, shooting at F 2.8 will possibly still be acceptable (More on this later).
Vignetting is usually pretty pronounced with UWA lenses at wide apertures. I’m finding it’s not easy to get a quantitative measure of vignetting with a lens that has a 180 degree field of view. Where do I find a uniformly lighted surface that will fit within the frame. I first tried my grey garage door, but I had to be within about 1 ft to almost fill the frame. With the closeest part of the door about one foot away and the fartherest part of the door about 7 feet away, I was’t sure that light reflected at these extreme angles would give me a good measure. Indeed the measurement did not make any sense. Next I tried shooting into heavy morning fog. The fog was thick enough that visibility was about 100 feet. I was able to get a gray patch of fog that fit from center frame to a corner, and the spot light meter was telling me that there was only about 1/3 of a stop of brightness difference in the fog over the expanse of interest. I set up on a tripod and exposed through the F-Stops using aperture priority and manually setting the stops. The first result was a measured vignette from center to corner of about 1 1/2 Stops at F 2.8 and gradually improving to about 1/2 stop at F 8. I’m not sure I believe this, as it is much smaller that all other UWA lens measurements I’ve seen. Usually they are in the 2-3 stop range. I’ll await other’s measurement of this parameter. The second interesting thing that happened with this sequence of images is that using aperature priority mode on the camera (camera set shutter speed and I manually set F-Stop), the images get brighter and brighter overall moving up from F 2.8. When checking the shutter speeds selected by the camera in “aperature priority” mode, the brightness differences are explained by the camera’s non-linear shutter time settings. For some reason, particularly below F 8, the camera tends to underexpose by up to 1 stop. I can’t explain why this is happening. Perhaps is has something to do with the way the camera light meter works with an UWA lens? For now, its just something I will be aware of when using wide aperatures. Again, it will be interesting to see if others see this phenomena.
Coma:
For astrophotography, coma is an important parameter and one that Rokinon (and lately Sigma Art Lenses ) has excelled at in the past. Coma manifests as a distortion of points of light. Stars appear as a winged object (some call them bat wings) rather that a distinct point. Coma is at its worst at the edges and corners of wide angle lens images. I had a clear sky on Christmas night. For a Coma test I made the shot below from my deck, and yes their are a lot of trees. However, there is enough clear sky with stars to check for Coma. The trees are illuminated from house lights, but the sky is reasonably dark for this test. The first image is shot at F 2.8, ISO 1600, shutter speed 15 seconds and focus set at my infinity pencil mark. There are very few LR adjustments: No sharpening, Temp 3734, Tint +6, Lens Corrections “Remove Cromatic Aberrations” box checked and Purple Hue in this same len corrections section at Amount 6. So, yes there was a bit of CA in some stars showing as a slight blue colored “Echo”. To me, the CA was easy to eliminate and therefore not an issue.
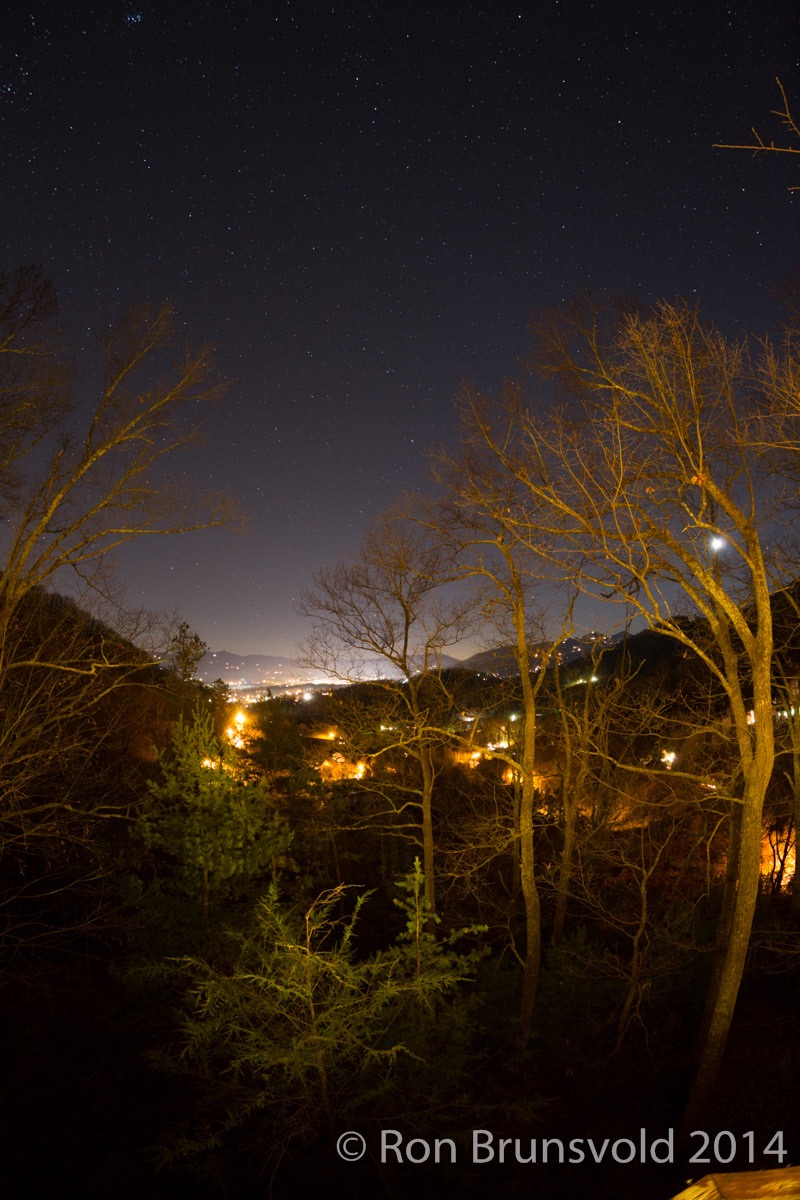
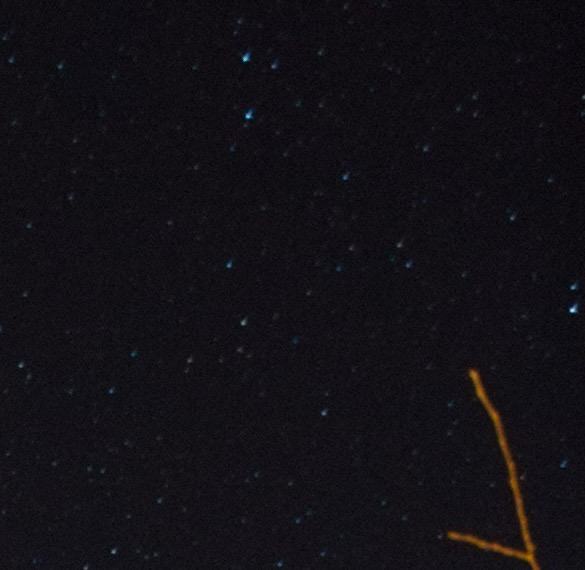
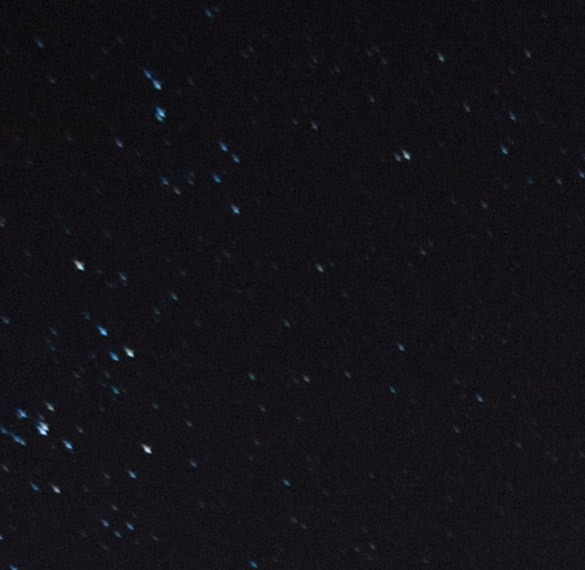
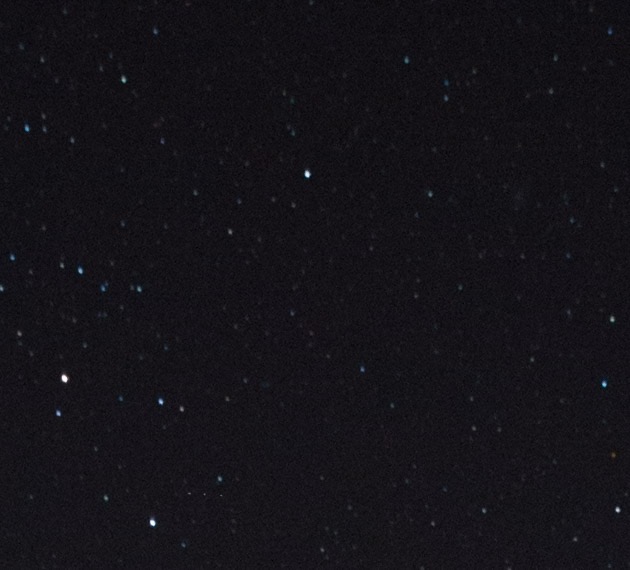
Below the full frame image, I have 3 crops from extreme edges of the top of the frame that are roughly 550 pixels on each side. The first is from the upper Right corner, the second is from the upper Left corner, and the third is centered on the upper edge. With the 15 second exposure there is only a slight star trail (motion blur) visible. The star motion appears somewhat larger in the upper Left corner. I think this is because that is toward the SW where Earth rotation has a more pronounced effect.
My conclusion from this shot is that yes there is some noticeable coma in the extreme corners, but its really not bad compared to some other un-named lenses and I can certainly live with it for my work. The top center crop is not showing any visible coma. Shooting at F 4 did not change things much, except for losing the stop of light. Looking back at the room photo above in this page, the extreme corner crop was fairly soft, but as you can see here, in a star field the softness doesn’t hurt the image much (or practically at all). Pixel peepers may see some star softness but no one else will. I am not going to have an issue shooting at night with this lens at F 2.8.
If you really want to take a look at the CA in the Canon .cr2 RAW image, you can download it here ( Coma / CA Test Image ). I ask that you respect my images and only download for personal, non-commercial use; no reposting or printing permitted of the complete image or any derivative of the image. This is a 28 MB RAW image and will probably take several minutes to download, so please Don’t if you will not use it. My Web Host may get hostile!
Chromatic Aberrations:
From the few photos that I’ve looked at closely, I’m not seeing much chromatic Aberration (CA). The lens is not complety free of these aberrations as looking at maximum magnification in light room (3:1), I can see just a hint of magenta/green CA on the edges of the fan blades in the room photograph above. This instantly disappears if you click the box “remove chromatic aberrations” box in the lens corrections section of LR. There is also a little bit of CA noticeable in some of the Stars of the night shot above. Also easily corrected. It’s probably too soon to make a sweeping conclusion here, but so far, so good.
Preliminary Conclusions:
As previously stated, I don’t really have enough time/experience with the Rokinon 12mm F 2.8 lens to make any sweeping conclusions. My preliminary assessment is that the lens is imminenly useable even in its all manual configuration. The lens is well built and can produce very sharp images. I am on the learning curve for finding the best subjects suitable for this lens and I plan to have some fun playing with it to find out what works best. If you have any comments about this hands-on review, feel free to contact me via the Contact Form. As time permits I’ll try to reply.